Emulating an Acorn Archimedes A5000 computer
Posted on Sunday, January 27, 2019 by TheBlackzone
![]() Back in 1992 I bought my first Acorn Archimedes computer, an Acorn A5000 running the RISC OS 3.11 operating system. I still have this machine around, but unfortunately it is not in working condition. Luckily you can emulate all sorts of older computer systems these days, and the same holds true for the Archimedes. So if you are fond of some nostalgic feelings, let's go...
Back in 1992 I bought my first Acorn Archimedes computer, an Acorn A5000 running the RISC OS 3.11 operating system. I still have this machine around, but unfortunately it is not in working condition. Luckily you can emulate all sorts of older computer systems these days, and the same holds true for the Archimedes. So if you are fond of some nostalgic feelings, let's go...
To emulate the A5000 I am using ArcEm, an open source emulator for the Acorn Archimedes machines, based on the ARMulator ARM instruction set simulator. It emulates machines like the A3000 or A5000 quite accurately, has some nice features and is easy to set up. However, it is not suitable to emulate later Acorn machines, like the A7000 or the RISC PC.
The following steps are a quick walkthrough on how I have set up the emulation on my Linux notebook. Since I am not using all of ArcEm's features, you should also read the ArcEm user manual for more in-depth information and some extra goodies.
Also, if you have never used RISC OS before, you should get an overview first. Some of the concepts in RISC OS are radically different from those in any other operating system. Also bear in mind that RISC OS 3.11, that is used in this emulation, is from 1992. Enough said.
Building the ArcEm emulator
Given you have set up the usual development tools on your Linux system (eg. apt-get install build-essential on Debian based systems), building ArcEm is a piece of cake.
Download the source code ZIP file (version 1.50 at the time of this writing) from the ArcEm download page at Sourceforge.
Then unpack the archive and compile ArcEm:
unzip arcem-1.50.2-src.zip cd arcem-src make That's it. The emulator can be executed by running ./arcem in the same directory. But wait...
Getting and installing the RISC OS ROMs
If you were curious and already tried to run the emulation you will have gotten an error message saying "Couldn't open ROM file". This is because, before the emulator can be used, it needs an image of the RISC OS ROMs that hold the operating system.
Contrary to other operating systems, RISC OS was not loaded from a storage media like a diskette or hard disc, but was stored on 4 ROM chips that were built into the computer.
In my case, I wanted to emulate the Acorn A5000, which was running RISC OS version 3.11. For this, the ROM images that hold the operating system can be obtained from the ROMs download section of the wonderful 4corn.co.uk archives. The file needed is riscos3_11.zip.
Unpacking the ZIP archive reveals four files which need to be concatenated to a single ROM image file like this:
unzip riscos3_11.zip cat IC24.ROM IC25.ROM IC26.rom IC27.ROM > ROM The resulting file "ROM" needs to be moved to the "arcem-src" directory and after that, the emulation can be started with the command
./arcem in the "arcem-src" directory. And here we go...
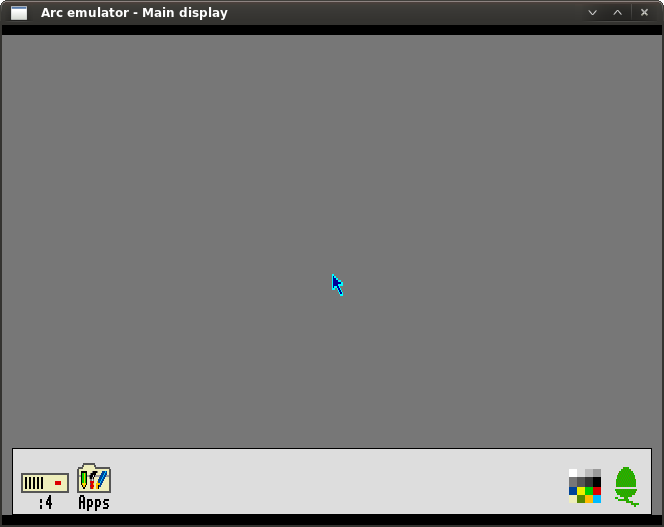
To switch between your host machine and the emulation press the "+" key on the numeric keypad.
Creating hard disc images
You will notice that clicking the hard disc icon ":4" will give an error. This is because we do not have an hard disc image yet. So let's do this next.
The current version of ArcEm supports the ST506 disc interface of the Archimedes computers with disc sizes of up to 64 MB. Although the documentation states that you can emulate up to four disc drives, RISC OS 3.11 itself does only allow two ST506 drives. So we will set up two discs in our system.
First grab the ready-made blank 64 MB hard disc image named "Blank RISC OS formatted 64MB Hard Drive Image" (HardImageFC64MB.zip) from the ArcEm download section and unpack it. This will give you a file name "HardImage1".
Move the file "HardImage1"to your "arcem-src" directory and create a copy of it named "HardImage2"
Before you can use these hard disc images, ArcEm needs to be made aware of the disc parameters. This is done by creating the file .arcemrc in your home directory.
So create the file /home/YOURUSERNAME/.arcemrc using your favorite text editor and set its content to
MFM disc 1 1024 8 32 256 MFM disc 2 1024 8 32 256 Save the file and then start the emulation again. You will now see a hard disc icon named ST506Disc5 with an empty 64 MB drive.

To activate the second drive, launch the "!Configure" application from the "Apps" folder on the icon bar, select "Discs" and increase the number of ST506 hard discs to two.
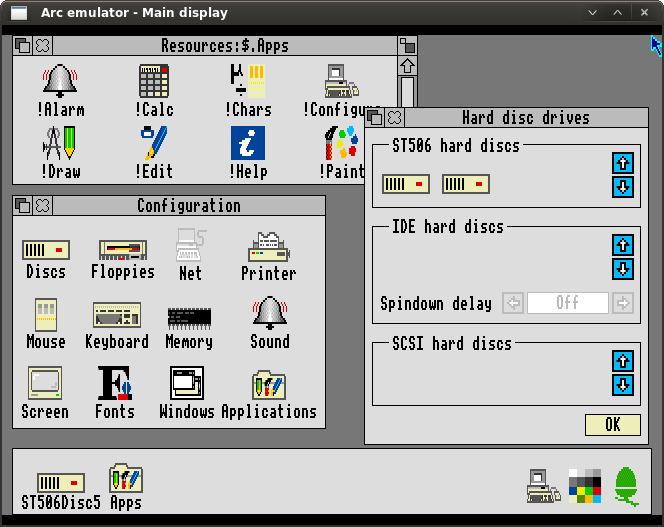

You have now two empty ST506 drives each with a capacity of 64 MB. You can rename the drives by selecting "Name disc" from the middle-mouse menu of the disc icons.
Floppy images
Just like with the hard discs, you can get empty floppy images from the ArcEm website. Again, from the download section, get the file "Blank RISC OS formatted 800KB Floppy Disc Image" (floppy800.zip) and unpack it. Move the resulting file "blank.adf" to your ArcEm directory and rename it to "FloppyImage0".
After launching the emulation again, you need to change the number of floppy disc drives in the !Configure application to 1 drive.
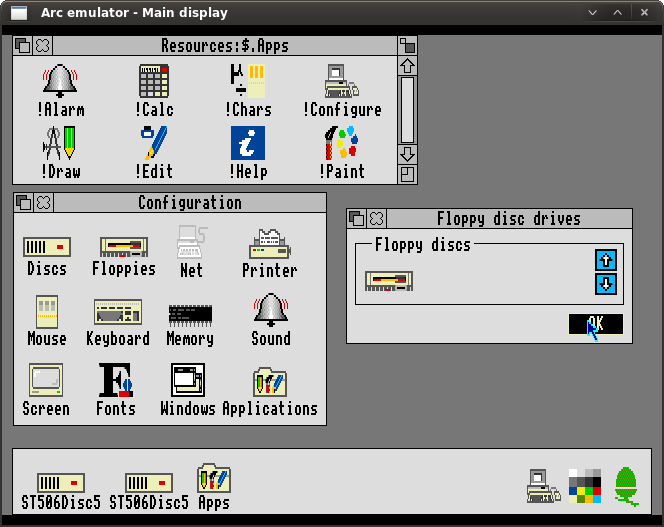

You can configure up to four floppy drives that correspond to the image file names "FloppyImage0" through "FloppyImage3". In the ArcEm command panel each floppy drive disc can be inserted/ejected by pressing the corresponding number key 0,1,2 or 3. However, discs are not exchangeable. So every disc that goes to floppy drive ":0" must always be named "FloppyImage0". Thus, if you have a series of floppy images you want to access, you need to eject it in the emulation and then rename the next disc to "FloppyImage0" and insert it again.
HostFS
Since swapping floppy disc images this way is cumbersome, ArcEm's HostFS can be used to exchange data between the emulated Acorn machine and the host system. Once it has been activated, a sub-directory of the emulation directory shows up as drive icon in the emulated machine.
In order to activate HostFS, create two new directories named "extnrom" and "hostfs" in the "arcem-src" directory.
mkdir extnrom mkdir hostfs Next, copy the the following files from the "support_modules" directory to the "extnrom" directory:
cp support_modules/hostfs/hostfs,ffa extnrom/ cp support_modules/hostfs/hostfsfiler,ffa extnrom/ cp support_modules/support/support,ffa extnrom/ For testing you might create an empty file in the "hostfs" directory:
touch hostfs/test.txt Now launch the emulation again and you will now see a new drive icon "HostFS" on the icon bar, containing the files of your "hostfs" directory.
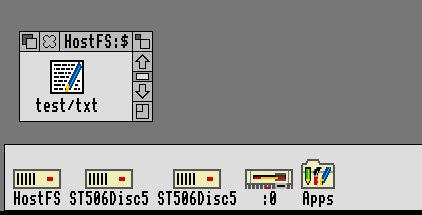
Just in case you are wondering why the file "test.txt" (with a dot) shows up as "test/txt" (with a slash) in the emulation, here is why: While Microsoft Windows and DOS-like operating systems use the backward slash to separate directory levels in pathnames, most other operating systems use the forward slash to do this. But commonly the dot character is used to seperate the file extension (denominating the type of file) from the actual filename. However, RISC OS uses the dot to seperate directory levels and uses the slash character to replace any occurence of dots in files names. And while this might seem to be a strange concept at a first glance, using dots as seperators is quite common in other places like domain names, chapter numbers, etc.
HighRes screen modes
Before we move on, let's have a little more screen space.
ArcEm comes with some additional screen modes with higher resolutions than those that were originally available on the Archimedes hardware. In my emulation I normally use the new screen mode 102 which gives a resolution of 1024x768 with 16 colors and suits me for most applications. You may use even higher resolutions, but I found a lot of them to be either with some weird display artifacts or slowing down the emulation to much.
In order to active the additional screen modes, copy the corresponding support module "ArcemModes,fa" from the "support_modules" directory to the "extnrom" directory.
cp support_modules/modes/ArcemModes,ffa extnrom/ After restarting the emulation, the screen mode can be changed by selecting "Mode" from the middle-mouse menu of the palette icon on the icon bar.
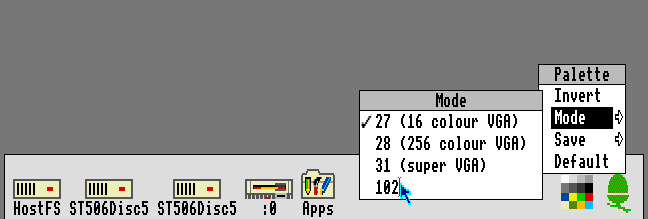
A complete list of available screen modes can be found in the ArcEm manual.
Populating the hard disc with the original RISC OS system files
Although at this point you already have a fully working RISC OS system, there is not much you can do with it right now as the system needs to be populated with more applications.
As a starter, the original Archimedes came with three diskettes that contained a bunch of applications and utilities. These diskettes were named "Applications Disc 1", "Applications Disc 2" and "Support Disc". You can download packed archives of the content of these diskettes from the Acorn FTP archive over at 4corn.co.uk. The files in question are named "app1.arc", "app2.arc" and "support.arc". You should also be able to find these files in every archive of the original Acorn FTP server under the path /riscos/releases/riscos310. Move these files to the "hostfs" directory after downloading.
At this point it gets a little bit more tricky. The files are in in the ARC archive format and in order to unpack them, you need to this from within the emulated Archimedes machine with an application named !SparkPlug. The reason for this is, that RISC OS stores the information about what file type a file has within its directory structure. Other operating systems do this via the file extension, for example ".txt" for text files, ".png" for PNG image files and so on. On RISC OS systems this information is hidden within the directory structure and can not be derived from the filename. Thus, if you would unpack the content of the archives on another operating systems, this information would be lost and the applications won't run.
So we need to download the self-extracting version of !SparkPlug (splug226.bas) from the corresponding information page on 4corn and move this file also to the "hostfs" directory. Once you have copied it there, rename all the files and remove their file extensions. You should then just have the four files named "app1", "app2", "support" and "splug226". This renaming step is necessary, because this version of RISC OS can only handle files with names up to 10 characters. And although you would see the full name within HostFS, copying them to the hard disc would give you the error "Bad name" (which would be the case for the files "support.arc" and "splug22.bas" as they have more than ten characters in length).
Next, the emulation needs to be launched again and the archive files as well as the "splug226.bas" files needs to be copied to one of the hard discs of the Archimedes.
In order to expand SparkPlug to a fully working application, middle-click the the "splug226" file and set its file type to "BASIC" in the corresponding menu entry. Then execute the file by double-clicking it, which will create the !SparkPlug application.
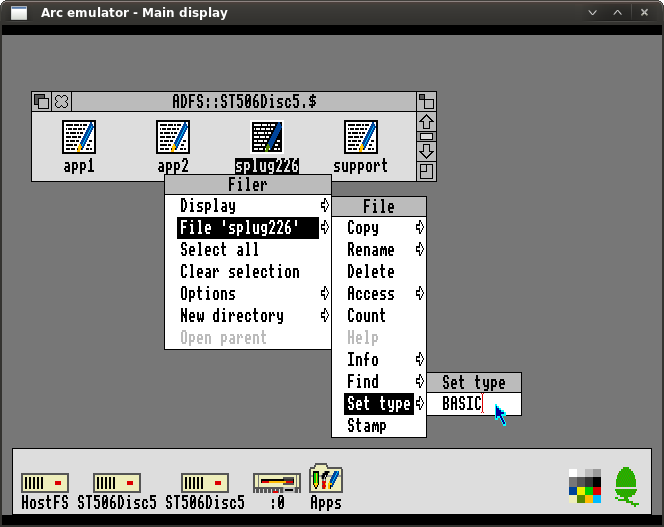
Before !SparkPlug can be used, we need to modify its "!Run" file. For this, shift-double-click on the application icon to show its content. Then shift-double-click the file "!Run" to open it in the text editor.
Look for this line and disable it by putting a pipe ("|") character at the start of the line
if "<System$Path>" = "" then Error 0 System resource cannot be found Next, look for the following line and enable it by removing the pipe character from the beginning of the line
Set Spark$Scrap <Spark$Path> 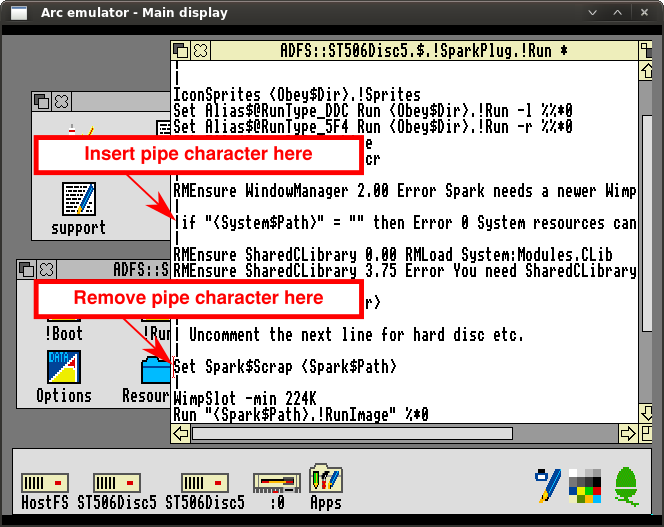
After that, save the file by pressing F3 and then ENTER.
Now close the editor window and the application directory and start !SparkPlug by double-clicking it. You will now see it started on the icon bar.
Next, drag the archive file "app1" onto the !SparkPlug icon on the icon bar. This will open the archive and show its content. You can now drag the content of the archive to your hard disc. Repeat this for the files "app2" and "support". Some files come as duplicates, causing !Sparkplug to issue an "Overwriting file" warning, which can safely be acknowledged.
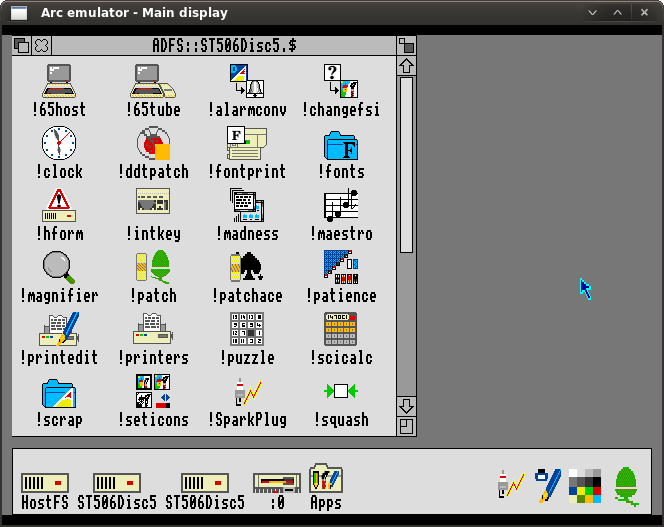
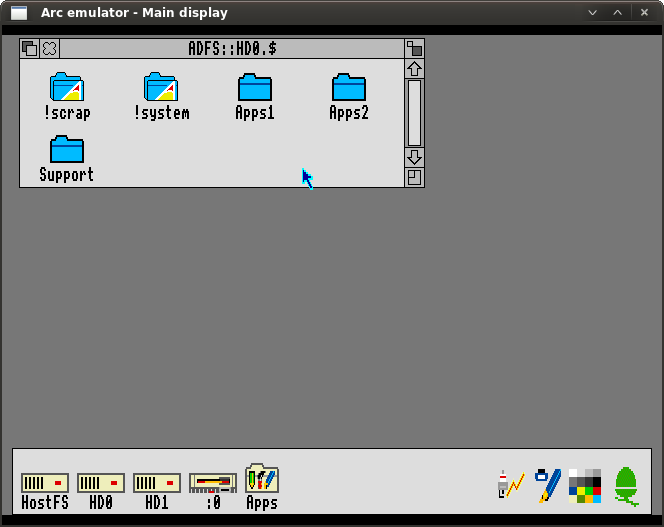
Afterwards you can organize the files by putting them in different directories. I have them like this:
Conclusion
With just a couple of steps you can set up a quite accurate emulation of an Acorn Archimedes A5000 computer from 1992. I use this setup mainly to access and convert files that I had created on my A5000 with applications that do not run on later version of RISC OS (like RISC OS 4.39 on my RISC PC or RISC OS 5.24 on my Raspberry Pi).
But, of course, other from that the usefulness of such an old computer systems is limited. You may want to run it for nostalgic reasons if you formerly have owned such a system, maybe playing some old games or running the applications you did your work in back then. Maybe you would like to check out another extraordinary (and sometimes obscure) operating system. Or maybe you would just like to have a peek what the early days of the ARM architecture looked like (fun fact: ARM originally meant "Acorn RISC Machines" and was later renamed to "Advanced RISC Machines").
In any case, ArcEm is a quick and easy way to make this happen.


